Clone Editor
The documentation of the old editor can be found here.
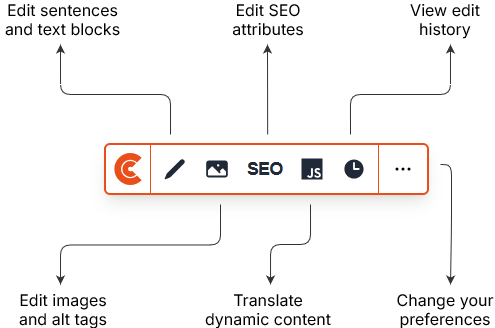
With the clone editor, you can easily edit clone content to your liking by using an integrated editor layer directly in your website. Below is a small illustration of the new editor's features:

Using the editor
Unlike the old editor, the new editor opens a new tab in your browser. It will appear as a toolbar on top of your website's page.
You can launch the editor from the ‘clone editor’ in the control panel. Launching the editor triggers a special session with which you can safely make changes to your website. As long as your edit session is active, you will be able to make changes with the editor. The edit session is active for a total of 60 minutes. If it has expired, you can start a new one via the control panel.
Edit text
To edit the text, you will need to set the editor to Text Mode. You can do this by clicking on the pencil icon in the editor.
When you have enabled Text Mode, a pencil will appear when you move the mouse over the text.
To make it easier to see which texts can be selected in Text Mode, the editor adds an overlay to the texts on the website. These are orange coloured and placed over the text elements. You can enable this function by pressing the three dots in the right of the toolbar and enabling highlights.
When you click on a word or piece of text, a pop-up will appear where you can edit the text. Here you can simply edit the text you see in the pop-up. Furthermore, from this pop-up you have the option of proofreading the content and viewing the history of this translation.
When you change a text fragment via the editor, everywhere on the cloned website where this exact text fragment appears (so without any additional or missing letters), this fragment will be changed. That means that you can change a link in your menu without that word being replaced by the new version anywhere else on your site, for example.
Replacing images
To modify an image, you will need to set the editor to Image Mode. You can do this by clicking on the painting in the editor.
When you have enabled Image Mode, a painting will appear when you move the mouse over the images.
Please note, not everything that might appear as an image, is editable with the Clone Editor. The rule of thumb here is: ‘Anything in a <img> tag can be replaced with the editor’.
To make it easier to see which images can be selected in Image Mode, the editor adds an overlay to the images on the website. These are placed light orange colour over the images. You can enable this function by pressing the three dots in the right of the toolbar and enabling highlights.
Alt-tag adjustments
Clonable automatically translates the alt text of images on the website. With the editor it is possible to adjust this text if required. You can do this by clicking on an image with the alt text, and then adjust the Alt text field. If the original image has no alt text, you will not be able to edit it either.
Adjusting SEO attributes
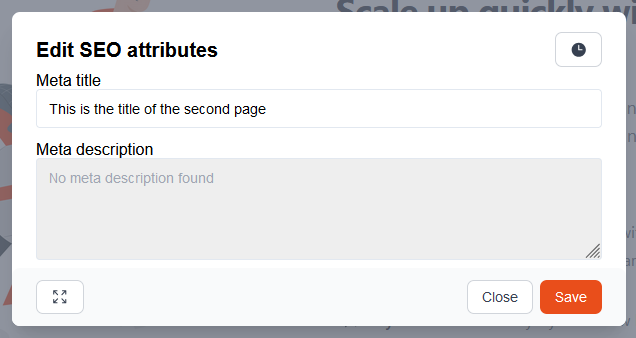
You can customise the SEO attributes by clicking on the editor's SEO button. This will open a window where you can edit the page's meta title and meta description. As long as the meta title and meta description on a page can actually be translated with Clonable, you will also be able to edit them with the editor. If the meta title or meta description cannot be edited with the editor, the fields will be disabled in the SEO window:

JavaScript mode
Before you get started with the Javascript translations, be aware that query selectors and the structure of HTML are essential. Knowledge about these subjects is thereby highly advised.
To add Javascript translations, you will need to set the editor to Javascript Mode. You can do this by clicking on the JS logo in the editor.
When you have switched on Javascript Mode, special query selection elements will appear next to the elements you hover your mouse over. These elements will only appear for texts that have not yet been translated by Clonable. These can be, for example, elements that are dynamically loaded onto the page via Javascript.
Creating a Javascript translation
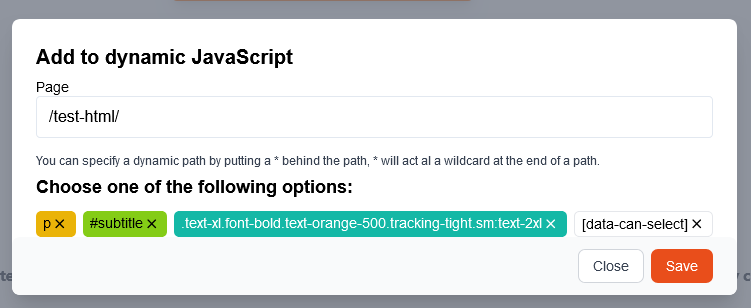
When you have found texts that are dynamically loaded on the page, you have the option to click on them. When you do this, a window will open to create a JavaScript translation. Such a window can look like this:

So here you can specify on which page the Javascript translations should be added, and which parts of the dynamic element will make the selector for the Javascript translation. We always recommend being as specific as possible here.
Edit history and rollback translations
Clonable also keeps track of the edits you make with the editor, so this allows you to know what you modified and when. And when you've made mistakes, for example, you can also revert the change.
There is a total of three points where you can view the translation editing history:
- General edit history, this lists ALL translations of the entire website. This screen can become quite cluttered when many edits have already been made. This overview is useful, for example, when you want to revert a deleted translation.
- SEO edit history, this can be found via the SEO window, here you can press the clock icon at the top right to view the history. In this history, you can see some of meta title and meta description.
- Text edit history, to make reversing translations a bit more manageable, you can also view the edit history for each translation. You do this by editing the text with the editor and clicking on the clock icon in the top right corner. This is useful, for example, if you want to revert a menu item to a previous version.
Rolling back the translation
With each of these three options, you have the options the history also shows a revert. You can simply reverse the version of the translation by clicking the revert button.
Helpful shortcuts 🚀
To make using the clone editor as easy as possible, a number of handy shortcuts have also been added:
| Button | What is does |
|---|---|
| 1 | Enable text replacement mode. |
| 2 | Enable image replacement mode. |
| 3 | Open SEO attribute dialog. |
| 4 | Enable Javascript selection mode |
| 5 | Open edit history dialog. |
| Shift + 1 | Moves the editor to the top left of the screen. |
| @ | Disable highlight overlay of text and images. |
| Esc | Switches the editor to default mode. |