Clone Editor
The documentation of the old editor can be found here.
With the Clone editor, you can edit text, images and SEO attributes directly on your Clone. You can also proofread text, improve several text elements together and translate text within images.
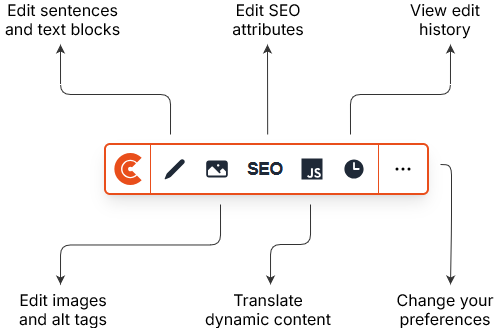
Using the editor
Open Clone editor in the control panel. The editor opens in a new tab and appears as a toolbar over your website. The editing session lasts 60 minutes. If it expires, start a new session through the control panel.
You can move the toolbar by dragging the Clonable logo. Press Ctrl + r to move it to the top left of the screen.
Use the three-dot menu to:
- Enable or disable highlights with Turn on highlights or Turn off highlights. These mark text and images you can select.
- Show the JavaScript button with Turn on javascript replacer.
- View keyboard shortcuts through View shortcuts.
- End the session through Close editor. Confirm this in the window that opens. You can restart the editor later through the control panel.
The available features depend on your Clone's access.
Edit text
- Click the pencil in the toolbar to enable
Text Mode. - Hover over the text and click the pencil that appears.
- Edit the text in the window and click Save.
Use the AI button to proofread the text. Use the clock icon to view its edit history.
A change applies everywhere on the Clone where the same complete text fragment appears. It does not replace individual words within other text fragments.
Proofreading text
Open a text in the editor and click the AI button. Choose a style, click Improve and check the suggested text. You can edit it before clicking Accept and save.
The following styles are available, including in Smart proofreader and for SEO attributes:
| Style | Use |
|---|---|
| Formal | Use a formal tone. |
| Informal | Use an informal tone. |
| Match current | Follow the current style. |
| Simplify | Simplify the text. |
| SEO-optimised manual | Take a keyword you enter into account. |
| SEO-optimised keyword | Take a keyword you select from the list into account. |
For SEO-optimised keyword, select a keyword from the dropdown. For other styles, you can enter your own keyword where the field is shown. Read more about the settings under proofreading.
Locking translations (beta)
Use the arrow next to Save to save and lock a text. For a locked text, the editor displays a padlock icon and the date it was locked. The number of available locks depends on your subscription.
| Action | Result |
|---|---|
| Save and lock (BETA) | Saves your text and locks the translation. |
| Save and unlock | Saves your text and removes the lock. |
| Unlock and regenerate | Removes the lock and regenerates the translation. The page reloads. |
Only choose Unlock and regenerate if you want the translation to be generated again. This action does not save the text you have just edited in the window.
Hidden or hard-to-select text
Unable to click a text, for example because another element overlaps it? Enable Text Mode and right-click as close as possible to the section containing the text. The Select a hidden text element window lists the hidden or non-clickable texts found there. Click a text in the list to edit it.
Proofreading multiple texts with Smart proofreader
Use Smart proofreader to proofread several text elements together. This is useful for a heading, subtitle and related text blocks where their relationship matters.
- Click the selection button in the toolbar. Its tooltip mentions Smart proofreader.
- Click and drag a selection box over the text elements you want to proofread.
- Check the list of selected texts. Remove any elements that do not belong in the selection, then click Next.
- Describe the context: what have you selected, how are the elements related and where are they on the page?
- Choose a style and enter or select a keyword if needed. Click Improve.
- Review the suggestions. Use Inline or Side-by-Side to compare changes, or None to hide difference highlighting. Untick any changes you do not want to accept.
- Click Apply selected changes to save the selected changes.
Check the content and meaning of the suggestions before saving them.
Replacing images
Click the image icon in the toolbar to enable Image Mode. Hover over an image and click the icon that appears to open the editing window.
The editor replaces images in HTML <img> elements. Not every element that looks like an image can be edited this way.
Replacing an image
- In
Image Mode, click the image you want to replace. - Open the Replacement tab.
- Enter the replacement image's full URL in New media path. This image must already be online, for example in your CMS.
- Check Replacement preview alongside Current image.
- Click Save image to save the replacement.
Read more about replacement rules and responsive images under image replacements.
Translating images
Does an image contain text, for example in a banner? You can translate that text into your Clone's language through the editor's image replacement feature. This feature is intended for images containing text. Translating logos is currently unsupported; the result may change your logo's appearance.
- Open the page containing the image in the editor and enable
Image Mode. - Click on the image you want to translate.
- Open the Translation tab and click Translate text in image.
- Compare the preview under Translated image with the original under Current image. Check both the text and the layout.
- Click Save image to use the translated image as an image replacement on your Clone.
The number of images you can translate depends on your subscription.
Clonable cannot guarantee that every image will be translated without errors or that the original layout will be preserved. Text may be longer or shorter in another language. This can change the positioning of text and the image's appearance. Check the preview before saving the translated image.
Storage and hosting images yourself
Clonable stores the translated image on Bunny CDN, the network we use to serve the image. The CDN link is used as the New source in your image replacement. You do not need to upload the image to your CMS yourself.

Prefer to host the image yourself? Open the translated image's CDN link, download the file and upload it to your own CMS. Then use the image's full URL as the new source in your image replacement.
Alt-tag adjustments
Clonable automatically translates image alt text: the text description used by screen readers, among other things. To change it, open the image in Image Mode, edit the Alt text field and click Save image. If the original image has no alt text, you cannot edit this field.
Adjusting SEO attributes
Click the SEO button in the toolbar to edit the current page's meta title and meta description. You can edit these fields if they can be translated by Clonable. Otherwise, the relevant field is disabled:
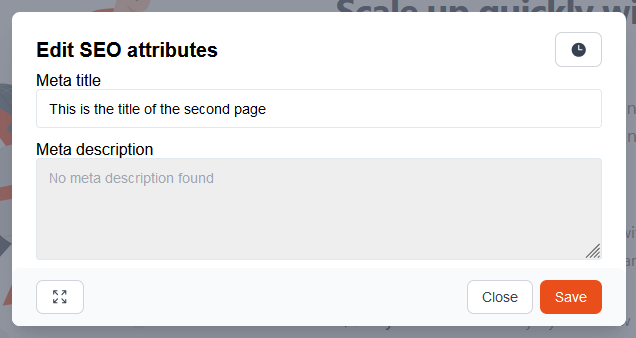
Click Save to save your changes.
Proofreading SEO text
An AI button appears next to the meta title and meta description fields. Click the button next to the field you want to improve, choose a style and select a keyword or enter your own. Click Improve, check the suggestion and edit it if needed. Click Accept and save to save the result.
JavaScript mode
Before you get started with the Javascript translations, be aware that query selectors and the structure of HTML are essential. Knowledge about these subjects is thereby highly advised.
Cannot see a JS button? Open the three-dot menu and click Turn on javascript replacer. The button is available if your Clone has access to JavaScript translations.
To add Javascript translations, you will need to set the editor to Javascript Mode. You can do this by clicking on the JS logo in the editor.
When you have switched on Javascript Mode, special query selection elements will appear next to the elements you hover your mouse over. These elements will only appear for texts that have not yet been translated by Clonable. These can be, for example, elements that are dynamically loaded onto the page via Javascript.
Creating a Javascript translation
When you have found texts that are dynamically loaded on the page, you have the option to click on them. When you do this, a window will open to create a JavaScript translation. Such a window can look like this:
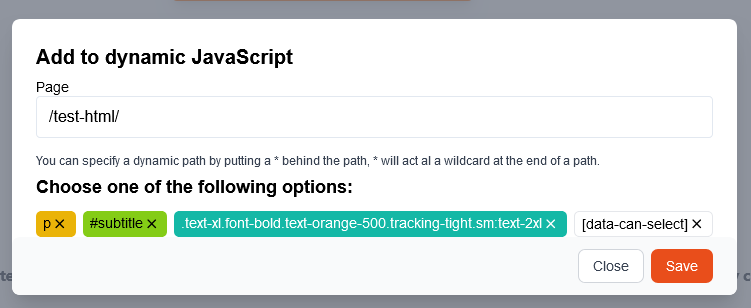
So here you can specify on which page the Javascript translations should be added, and which parts of the dynamic element will make the selector for the Javascript translation. We always recommend being as specific as possible here.
Edit history and rollback translations
The edit history shows which translations you changed and when. You can open it in three places:
- General edit history: click the clock icon in the toolbar for an overview of text edits on the Clone.
- SEO edit history: click the clock icon in the SEO window for the history of the meta title and meta description.
- Text edit history: open a text in the editor and click the clock icon to view earlier versions of that text fragment.
Rolling back the translation
Click revert next to the version you want to restore.
Keyboard shortcuts
You can also view these shortcuts through View shortcuts in the three-dot menu.
| Shortcut | Effect |
|---|---|
Ctrl + e | Enable text mode. |
Ctrl + i | Enable image mode. |
Ctrl + s | Open the SEO window. |
Ctrl + j | Enable JavaScript mode. |
Ctrl + h | Open edit history. |
Ctrl + o | Toggle highlights on or off. |
Ctrl + k | Open the shortcut overview. |
Ctrl + r | Move the toolbar to the top left. |
| Right-click in text mode | Show hidden or non-clickable text. |
Esc | Close windows and return to the default mode. |